Introduction:
Your garage door opener is a vital component of your home, providing convenience and security. Regular cleaning and maintenance can ensure its smooth operation. In this guide, we’ll walk you through the DIY steps to clean and maintain a garage door opener, preserving its longevity.
Safety First: Disconnect the Power:
Before starting any maintenance on your garage door opener, prioritize safety. Disconnect the power by unplugging the opener or turning off the circuit breaker. This ensures that the system is completely shut down, reducing the risk of accidental activation during the cleaning process.
Cleaning the Exterior:
The exterior of your garage door opener can accumulate dust and dirt over time. Use a soft, damp cloth to wipe down the surfaces, including the control panel and sensor eyes. Be gentle to avoid damaging any components. Cleaning the exterior not only improves the appearance but also prevents debris from interfering with the sensors.
Inspecting and Tightening Hardware:
Regular inspection of the hardware is crucial for optimal garage door opener performance. Check for loose screws, bolts, and nuts. Tighten any that have come loose using the appropriate tools. This simple step ensures that all components are secure and reduces the risk of malfunctions.
Lubricating Moving Parts:
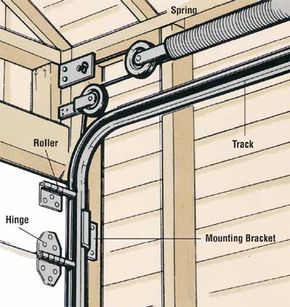
Lubrication is key to the smooth operation of your garage door opener. Use a garage door lubricant or a silicone-based lubricant to grease the moving parts such as the chain, rollers, and hinges. Apply the lubricant sparingly to prevent excess buildup. Lubricating these components minimizes friction, reducing wear and tear.
Testing Safety Features:
Garage door openers come equipped with safety features, including sensors that detect obstacles in the door’s path. Regularly test these safety features to ensure they are functioning correctly. Place an object in the door’s path and close it. The door should automatically reverse if it encounters an obstruction. If not, inspect and troubleshoot the sensors.
Checking and Adjusting the Door Balance:
A well-balanced garage door is essential for the smooth operation of the opener. Disconnect the opener and manually open the door halfway. If the door does not stay in place, it may be unbalanced. Adjust the tension in the springs or seek professional assistance to ensure the door is correctly balanced.
Examining the Cables:
Inspect the cables for any signs of fraying or wear. Damaged cables can compromise the safety and functionality of your garage door opener. If you notice any issues, it’s advisable to consult with a professional technician for repairs or replacements.
Cleaning the Tracks:
Over time, debris and dirt can accumulate in the tracks, affecting the door’s movement. Use a vacuum or a soft brush to clean the tracks thoroughly. Ensure there are no obstructions that could impede the smooth opening and closing of the garage door.
Testing the Remote Control:
The garage door opener remote control is a vital component for user convenience. Test the remote control’s batteries and replace them if necessary. Check the range and responsiveness of the remote to ensure it communicates effectively with the opener. If you encounter issues, consider reprogramming the remote or seeking professional assistance.
Reconnecting Power and Final Testing:
After completing the cleaning and maintenance tasks, reconnect the power to the garage door opener. Perform a final test by opening and closing the door using both the remote control and the wall-mounted control panel. Listen for any unusual noises or vibrations, which may indicate underlying issues.
In conclusion, regular DIY cleaning and maintenance of your garage door opener is essential for its longevity and reliable performance. By following these simple steps, you can ensure that your garage door opener operates smoothly, providing convenience and security for years to come. For more detailed guidance and additional DIY tips, visit mimimises.org.

