
Introduction:
A well-maintained deck not only adds aesthetic value to your home but also serves as a delightful outdoor space. Staining and sealing your deck is a crucial DIY task that enhances its longevity and preserves its natural beauty. In this article, we will guide you through the process of staining and sealing your deck with a comprehensive do-it-yourself approach.
Understanding the Importance of Staining and Sealing:
Before diving into the DIY process, it’s essential to grasp why staining and sealing your deck are vital. Stain enhances the deck’s appearance by adding color and protecting it from the sun’s harmful UV rays. Sealant, on the other hand, creates a protective barrier against moisture, preventing warping, cracking, and other weather-related damage.
Gathering the Necessary Tools and Materials:
The first step in any successful DIY project is gathering the necessary tools and materials. For staining and sealing your deck, you’ll need a pressure washer, a deck cleaner, a paintbrush or roller, a stain and sealant product, and protective gear such as gloves and safety glasses. Make sure to choose a stain and sealant suitable for your deck’s wood type.
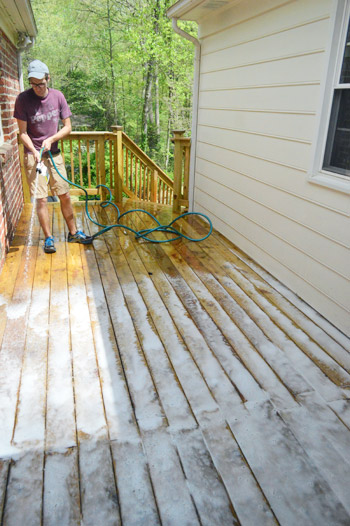
Cleaning and Preparing the Deck Surface:
Proper preparation is crucial for a successful staining and sealing process. Begin by cleaning the deck surface using a pressure washer and a deck cleaner. Remove dirt, debris, and any old stain or sealant that may be present. Allow the deck to dry thoroughly before proceeding to the next step.
Sanding for a Smooth Surface:
Once the deck is dry, consider sanding the surface to ensure a smooth finish. Sanding helps remove any rough spots, imperfections, or splinters, creating an even canvas for the stain and sealant. Pay extra attention to high-traffic areas and any visible flaws.
Choosing the Right Stain Color:
Selecting the right stain color is a personal choice that depends on your taste and the overall aesthetic of your home. Consider whether you want a transparent, semi-transparent, or solid color stain. Transparent stains showcase the wood’s natural grain, while solid stains provide more color coverage.
Applying the Stain:
With the deck cleaned, dried, and sanded, it’s time to apply the stain. Use a paintbrush or roller to evenly distribute the stain across the deck surface. Work in small sections to ensure consistency, and be mindful of any overlapping to avoid streaks. Follow the manufacturer’s instructions for drying times between coats.
Sealing the Deck for Protection:
Once the stain has adequately dried, apply the sealant to protect the wood from the elements. Like the stain, use a paintbrush or roller for an even application. Pay extra attention to areas exposed to direct sunlight and heavy foot traffic. Applying a second coat of sealant can provide added protection.
Allowing Ample Drying Time:
After completing the staining and sealing process, allow ample drying time before returning furniture and resuming regular use of the deck. Adequate drying ensures the stain and sealant properly bond with the wood, maximizing their effectiveness.
Regular Maintenance for Longevity:
To ensure the longevity of your deck’s finish, incorporate regular maintenance into your routine. This may include occasional cleaning, spot repairs, and reapplication of sealant as needed. Regular maintenance not only preserves the beauty of your deck but also extends its lifespan.
Conclusion:
Staining and sealing your deck is a rewarding DIY project that not only enhances its appearance but also protects it from the elements. By understanding the importance of these steps, gathering the right tools, and following a systematic process, you can enjoy a beautifully stained and sealed deck for years to come. For detailed guidance on staining and sealing your deck, you can visit stain and seal a deck DIY. This resource provides additional insights and step-by-step instructions to help you achieve a professional finish.