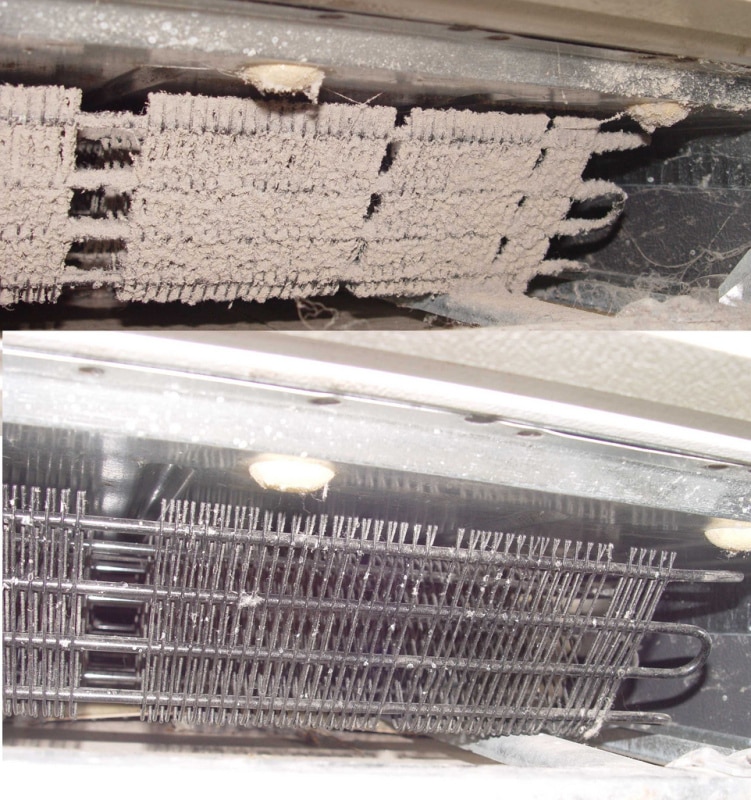

Clean Refrigerator Coils Independently for Efficiency
Refrigerators are essential appliances in our homes, working tirelessly to keep our food fresh. However, to ensure optimal performance, it’s crucial to clean the refrigerator coils regularly. Follow this DIY guide to maintain your refrigerator’s efficiency and prolong its lifespan.
Understanding the Role of Refrigerator Coils
Refrigerator coils, located either on the back or underneath the appliance, play a vital role in heat exchange. They remove heat from inside the fridge and release it into the surrounding air. Over time, these coils accumulate dust and debris, hindering their ability to function efficiently.
Why Cleaning Refrigerator Coils Matters
When refrigerator coils are covered in dirt, dust, and pet hair, the appliance must work harder to cool down. This increased workload can lead to higher energy consumption and potential overheating. Regular cleaning not only improves efficiency but also prevents unnecessary strain on the refrigerator’s compressor.
Gathering the Necessary Tools
Cleaning refrigerator coils is a straightforward task that requires minimal tools. To get started, gather a vacuum cleaner with a brush attachment, a coil brush or a long-handled brush, and a damp cloth. These tools will help you remove the accumulated debris without causing damage to the coils.
Locating and Accessing the Coils
Before you begin cleaning, locate the coils. In most refrigerators, the coils are either on the back or underneath. If they are on the back, you may need to pull the refrigerator away from the wall to access them. If underneath, there is usually a panel that can be removed for easy cleaning.
Removing Loose Debris with a Brush or Vacuum
Start by removing loose debris using a coil brush or the brush attachment of your vacuum cleaner. Gently brush or vacuum away dust, cobwebs, and any other visible dirt. Be thorough but gentle to avoid damaging the coils. This step significantly improves the coils’ efficiency.
Deep Cleaning with a Coil Brush or Long-Handled Brush
For a more thorough cleaning, use a coil brush or a long-handled brush to reach areas that the vacuum may have missed. Insert the brush carefully between the coils to dislodge any trapped dirt. This process ensures that the coils are free from all debris, allowing for optimal heat exchange.
Wiping Down the Coils
After removing the loose and trapped debris, use a damp cloth to wipe down the coils. This step helps eliminate any remaining dust and ensures the coils are clean and ready to function efficiently. Allow the coils to dry before restoring power to the refrigerator.
Cleaning the Surrounding Area
While you’re at it, take the opportunity to clean the surrounding area. Dust and dirt can accumulate on the floor and walls behind the refrigerator. Wipe down these surfaces to prevent debris from finding its way back to the coils.
Regular Maintenance Schedule
To maintain your refrigerator’s efficiency, establish a regular cleaning schedule. Aim to clean the coils at least twice a year or more frequently if you have pets. This preventive maintenance routine will help your refrigerator run smoothly and save energy.
Conclusion: A DIY Task for Improved Efficiency
Cleaning refrigerator coils on your own is a simple yet effective DIY task that can have a significant impact on your appliance’s efficiency. By dedicating a little time to this maintenance chore, you not only prolong the life of your refrigerator but also contribute to energy savings.
For additional tips and expert advice on cleaning refrigerator coils on your own, visit mimimises.org for valuable resources and guidance.
